
Several weeks ago, my BFF Neighbor Girl began to say that she wanted to throw me a baby shower. I cringed and changed the subject as soon as possible. I hate being the center of attention, I don't like big gatherings and the idea of inviting people to bring over gifts is so awkward. We argued and she persisted and to make a long story short, I agreed to it so long as we could keep it simple. That's how a lot of my friends gathered together this Sunday for an ice cream social and I have to say I had the loveliest time.
We wanted an afternoon get-together and the blistering weather these days is simply crying out for frozen desserts, so the choice of a menu revolving around ice cream was a pretty easy choice. The wonderful thing about an ice cream social is that you can keep it as simple as you like by buying different flavors of ice cream and setting them out with toppings like fruits, sauces and nuts, or you can invest some time in making ice creams and other frozen treats at home. We chose a balance of the two, making two homemade ice creams and putting together one frozen dessert and buying some of the ice cream. A lot of the ice cream sold in stores is full of artificial ingredients and fillers; it is well worth it to read labels and seek out the good stuff with a short ingredient list and high-quality natural ingredients.
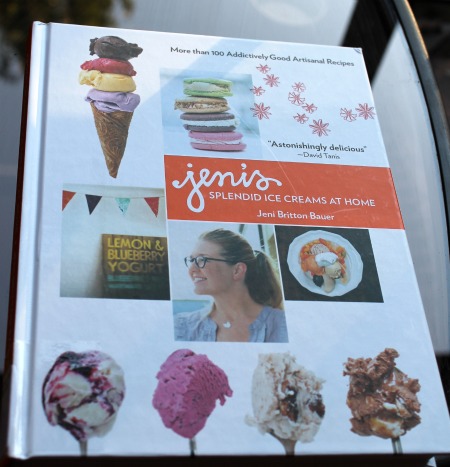
As we were planning the menu, I happened to check out the most incredible ice cream cookbook from the library, Jeni's Splendid Ice Creams at Home- a new release from the famous ice cream store in Ohio. This book was a real treat to read and full of inspiring ideas. Jeni's ice cream is quite different because she avoids egg yolks in the ice cream base, relying instead on some cream cheese and cornstarch to provide a silky texture. In a sense, it reminds me more of kulfi. This ice cream base has a lighter, smoother flavor and makes these recipes very suitable for people who don't or can't eat eggs. The book has luscious ideas for ice cream sauces, and ideas for serving ice cream in the form of terrines and sundaes.

This was the menu we worked out:
1. Two large tubs of good quality ice cream from the store in the two most crowd-pleasing flavors: vanilla and chocolate. I chose a Belgian chocolate flavor that sounded very rich and decadent.
2. Accessories for "make your own sundaes": I made a batch of brownies using my favorite recipe for Alice Medrich's cocoa brownies and also made some "magic shell" chocolate sauce, the kind that hardens into a shell when you pour it on ice cream. I used to love this stuff in the form on choco-bars growing up. The recipe for this sauce came from Jeni's book that I mentioned above- it contains two ingredients, coconut oil and chocolate, melted together. Wow. We set out ripe strawberries, chopped walnuts and chocolate chips as sundae add-ons.
3. To have a couple of extra gourmet ice cream flavors on hand, we bought two tubs of gelato from Whole Foods, fig orange which V loves, and strawberry custard, half of which we ended up using for the cassata (below).
4. To make ice cream sodas, we got a few bottles of orange cream soda and strawberry pop from Fitz's, a local soda company. Ice cream sodas are ridiculously simple to make. See a recipe here, all it needs apart from the soda is vanilla ice cream and we already had that on hand.
5. To make falooda or rose sundaes, I made a concoction of falooda noodles, basil seeds also called subja/tukmaria and rose syrup (all three ingredients are sold in Indian grocery stores). When someone wanted to try the falooda, I would scoop some of this into a glass and add a scoop of vanilla ice cream. Falooda is a unique summer treat; for a complete recipe, see Ashwini's gorgeous post.
6. I bought an ice cream maker last summer and enjoy using it, so I made two ice cream recipes at home for the party. One was this roasted cherry coconut ice cream which turned out OK. The other was Jeni's roasted pistachio ice cream which was utterly fabulous and a recipe I will make over and over again. I used the recipe from the book, which is very close to the recipe posted here. My modification was to skip the almond extract and instead add a large pinch of saffron to make kesar pista ice cream. The only special ingredient in this ice cream is light corn syrup which everyone may not have on hand. I had a bottle on hand because I use this stuff once a year for pecan pie at Thanksgiving.
7. I assembled a cassata for the party and the recipe is at the end of the post.
8. Finally, we bought a box of waffle cones from the grocery store to give guests the option of a cone or a cup.
We printed off a menu listing all of the ice cream treats and posted it on the fridge so guests could choose what they liked. We set out bowls, small plates, spoons and napkins and that was it- we were ready to party.
Now for the cassata! I would not have been able to put this together were it not for the collective wisdom shared by so many of you in the comments on this post. All in all, it sounds like cassata is assembled with a thin layer of cake, three ice cream flavors- any combination of kesar-pista, tutti-frutti, vanilla, chocolate, butterscotch- and a topping of nuts. The exact assembly seems to depend on the brand of cassata. Here's how we put together our version (V did all the assembly here).

1. Start with a loaf pan. Line it with plastic wrap so that the plastic covers the bottom and the sides and overhangs over the top edge of the pan. This allows for easy unmolding of the finished dessert.
2. Lay down thin slices of pound cake to cover the bottom of the pan. I did not want to make a whole pound cake just to use one slice, so I bought a large slice of pound cake at the bakery and cut that up. Any flavor would work- we used orange pecan pound cake.
3. Choose any three flavors of ice cream. It is great to use different colors and diverse flavors- in our case it was sweet, mild strawberry gelato, vanilla and nutty almost salty pistachio-saffron ice cream. One by one, soften each ice cream just until it is easy to scoop and spread. Layer the first ice cream in one third of the loaf pan, then cover with plastic and return to freezer for 20 to 30 minutes. Repeat with other flavors. Top the last layer with a scattering of roasted cashews. Cover with plastic and freezer until ready to serve.
4. Right before the party, you can slice the cassata to make it easier to serve. Unmold the cassata onto a cutting board. Use a serrated knife to quickly slice the cassata into neat slices. You can get anywhere from 8 to 12 slices from each loaf. Place the slices on a platter and return to freezer.

The cassata was such a lovely treat! In one small slice, you can taste so many flavors and textures. It is easy to see how one could make endless variations on this theme and create custom combinations for a party, using store bought ice cream or home made, or a combination, like I did. I can see myself making cassatas or ice cream terrines for many occasions in the future.
Our ice cream social was a very enjoyable affair. While it sounds like a logical choice for a children's party, it was a treat for us grown-ups to be able to indulge in ice cream and feel like a child again. This party can be tailored to different dietary needs- for instance, by including non-dairy soy or coconut ice creams for vegan guests. Sorbets and frozen yogurt are other variations that can be included. A big ice cream cake could be a festive centerpiece. Ice cream sandwiches, bonbons, popsicles could also be served- there are so many possibilities to make an ice cream social special.
At the end of the day, I went to bed feeling very lucky indeed, to be enveloped in the love and support of so many good friends.

We wanted an afternoon get-together and the blistering weather these days is simply crying out for frozen desserts, so the choice of a menu revolving around ice cream was a pretty easy choice. The wonderful thing about an ice cream social is that you can keep it as simple as you like by buying different flavors of ice cream and setting them out with toppings like fruits, sauces and nuts, or you can invest some time in making ice creams and other frozen treats at home. We chose a balance of the two, making two homemade ice creams and putting together one frozen dessert and buying some of the ice cream. A lot of the ice cream sold in stores is full of artificial ingredients and fillers; it is well worth it to read labels and seek out the good stuff with a short ingredient list and high-quality natural ingredients.
As we were planning the menu, I happened to check out the most incredible ice cream cookbook from the library, Jeni's Splendid Ice Creams at Home- a new release from the famous ice cream store in Ohio. This book was a real treat to read and full of inspiring ideas. Jeni's ice cream is quite different because she avoids egg yolks in the ice cream base, relying instead on some cream cheese and cornstarch to provide a silky texture. In a sense, it reminds me more of kulfi. This ice cream base has a lighter, smoother flavor and makes these recipes very suitable for people who don't or can't eat eggs. The book has luscious ideas for ice cream sauces, and ideas for serving ice cream in the form of terrines and sundaes.
This was the menu we worked out:
1. Two large tubs of good quality ice cream from the store in the two most crowd-pleasing flavors: vanilla and chocolate. I chose a Belgian chocolate flavor that sounded very rich and decadent.
2. Accessories for "make your own sundaes": I made a batch of brownies using my favorite recipe for Alice Medrich's cocoa brownies and also made some "magic shell" chocolate sauce, the kind that hardens into a shell when you pour it on ice cream. I used to love this stuff in the form on choco-bars growing up. The recipe for this sauce came from Jeni's book that I mentioned above- it contains two ingredients, coconut oil and chocolate, melted together. Wow. We set out ripe strawberries, chopped walnuts and chocolate chips as sundae add-ons.
3. To have a couple of extra gourmet ice cream flavors on hand, we bought two tubs of gelato from Whole Foods, fig orange which V loves, and strawberry custard, half of which we ended up using for the cassata (below).
4. To make ice cream sodas, we got a few bottles of orange cream soda and strawberry pop from Fitz's, a local soda company. Ice cream sodas are ridiculously simple to make. See a recipe here, all it needs apart from the soda is vanilla ice cream and we already had that on hand.
5. To make falooda or rose sundaes, I made a concoction of falooda noodles, basil seeds also called subja/tukmaria and rose syrup (all three ingredients are sold in Indian grocery stores). When someone wanted to try the falooda, I would scoop some of this into a glass and add a scoop of vanilla ice cream. Falooda is a unique summer treat; for a complete recipe, see Ashwini's gorgeous post.
6. I bought an ice cream maker last summer and enjoy using it, so I made two ice cream recipes at home for the party. One was this roasted cherry coconut ice cream which turned out OK. The other was Jeni's roasted pistachio ice cream which was utterly fabulous and a recipe I will make over and over again. I used the recipe from the book, which is very close to the recipe posted here. My modification was to skip the almond extract and instead add a large pinch of saffron to make kesar pista ice cream. The only special ingredient in this ice cream is light corn syrup which everyone may not have on hand. I had a bottle on hand because I use this stuff once a year for pecan pie at Thanksgiving.
7. I assembled a cassata for the party and the recipe is at the end of the post.
8. Finally, we bought a box of waffle cones from the grocery store to give guests the option of a cone or a cup.
We printed off a menu listing all of the ice cream treats and posted it on the fridge so guests could choose what they liked. We set out bowls, small plates, spoons and napkins and that was it- we were ready to party.
Now for the cassata! I would not have been able to put this together were it not for the collective wisdom shared by so many of you in the comments on this post. All in all, it sounds like cassata is assembled with a thin layer of cake, three ice cream flavors- any combination of kesar-pista, tutti-frutti, vanilla, chocolate, butterscotch- and a topping of nuts. The exact assembly seems to depend on the brand of cassata. Here's how we put together our version (V did all the assembly here).
Cassata
1. Start with a loaf pan. Line it with plastic wrap so that the plastic covers the bottom and the sides and overhangs over the top edge of the pan. This allows for easy unmolding of the finished dessert.
2. Lay down thin slices of pound cake to cover the bottom of the pan. I did not want to make a whole pound cake just to use one slice, so I bought a large slice of pound cake at the bakery and cut that up. Any flavor would work- we used orange pecan pound cake.
3. Choose any three flavors of ice cream. It is great to use different colors and diverse flavors- in our case it was sweet, mild strawberry gelato, vanilla and nutty almost salty pistachio-saffron ice cream. One by one, soften each ice cream just until it is easy to scoop and spread. Layer the first ice cream in one third of the loaf pan, then cover with plastic and return to freezer for 20 to 30 minutes. Repeat with other flavors. Top the last layer with a scattering of roasted cashews. Cover with plastic and freezer until ready to serve.
4. Right before the party, you can slice the cassata to make it easier to serve. Unmold the cassata onto a cutting board. Use a serrated knife to quickly slice the cassata into neat slices. You can get anywhere from 8 to 12 slices from each loaf. Place the slices on a platter and return to freezer.
The cassata was such a lovely treat! In one small slice, you can taste so many flavors and textures. It is easy to see how one could make endless variations on this theme and create custom combinations for a party, using store bought ice cream or home made, or a combination, like I did. I can see myself making cassatas or ice cream terrines for many occasions in the future.
Our ice cream social was a very enjoyable affair. While it sounds like a logical choice for a children's party, it was a treat for us grown-ups to be able to indulge in ice cream and feel like a child again. This party can be tailored to different dietary needs- for instance, by including non-dairy soy or coconut ice creams for vegan guests. Sorbets and frozen yogurt are other variations that can be included. A big ice cream cake could be a festive centerpiece. Ice cream sandwiches, bonbons, popsicles could also be served- there are so many possibilities to make an ice cream social special.
At the end of the day, I went to bed feeling very lucky indeed, to be enveloped in the love and support of so many good friends.


